Blog (Heading)

Reset drum (photoconductor) IBM & Lexmark

Reset drum (photoconductor) IBM & Lexmark

How to reset the photoconductor counter

Read comments | Leave your comment |


Overview


Photoconductor (PC) Life Warning or a Replace Photoconductor message on the printer screen indicates that the photoconductor unit in the printer is near or past its expected life rating of 30,000 single-sided pages. You will need to replace the photoconductor unit inside the printer when you see this message. NOTE: It may occasionally be necessary to replace the photoconductor unit in order to correct a print quality problem such as toner streaks on the page.  
Replacing the photoconductor unit/kit

WARNING! When replacing a photoconductor kit, do not leave the new photoconductor kit exposed to direct light (especially sunlight) for an extended period of time. Extended light exposure can cause damage to the new photoconductor kit, which may lead to print quality problems.
 
Step Action Click Image to Enlarge
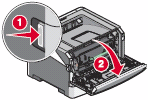
1 Press the button on the left-hand side of the printer and open the front door.
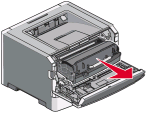
2 Remove the print cartridge assembly.

  1. Grasp the toner cartridge handle and pull up and out. Note: Do not press the button on the print cartridge assembly. 
     
  2. Place the print cartridge assembly on a flat, clean surface.
3 Separate the toner cartridge from the photoconductor unit.

  1. Press the button on the base of the print cartridge assembly.
     
  2. Grasp the toner cartridge handle, and pull up and out.
   4 Unpack the new photoconductor kit.  
5 Install the toner cartridge into the new photoconductor unit.

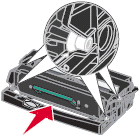
  1. Align the white rollers on the toner cartridge with the white arrows on the tracks of the photoconductor. 
     
  2. Push the toner cartridge in as far as it will go. It should click into place when correctly installed.
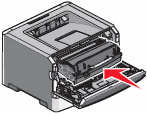
6 Install the print cartridge assembly into the printer.

  1. Align the green arrows on the guides of the print cartridge assembly with the green arrows on the tracks in the printer. 
     
  2. Push the print cartridge assembly in as far as it will go.
7 Close the front door.  
8

Reset the photoconductor counter. 

   
  1. Install the new kit(or used kit) with the printer is turned ON.

2. Open the front panel.

3. Hold the Cancel button in until the front panel LEDs flash.

4. Close the front panel

and ready to use!!!!
 

Read comments | Leave your comment |


 Source of information: Service support, IBM & Lexmark & SCC & Uninet & Summit

About the author


André Dagenais, president of the company, with more than 30 years of experience in the domain, is one of North American pioneers in the ink cartridges reconditioning.

He is one of the rare people to have taught and shared his skill directly to the source of the biggest North American and Asian manufacturers. It is also him who formed the great majority of the cartridges reconditioning technicians in Quebec.

In 2008 he sells is partnership to become "André Ink"

Specialized in the production high custom-made range, in the sale and the distribution of recycled, compatible and original ink cartridges, André Ink knows an immediate success.

The competition and the sellers on the Internet understood quickly that it was easier to sell a price than a good product, however, André Ink continues to sensitize the consumer so that he understands that it is impossible to buy a recycled or compatible reliable and good quality, less expensive than it cost to make it.

Faithful to our policy on the yield and the reliability of the proposed products, André Ink selects for you the best products coming from various manufacturers, importers and distributors who respect our quality criteria and if we are not capable of supplying you what is best, we shall make it for you.

Related Comments

Leave your comment


Article Categories